Showing posts with label Blog Hop. Show all posts

Friday, May 1, 2015

Moxxie {Blog Hop}

Good morning! Is it really May already!? These months are just flying by! But if it’s a new month it means it’s time for another MOXXIE blog hop! I don’t know about you but I always look forward to seeing everyone’s amazing projects! The Muses always seem to pull out all the stops to create some amazing things!  Make sure you read to the bottom to find out how to WIN one of these fantastic NEW lines!!

For today’s blog hop, out of the three BRAND NEW awesome lines, I was given the new softball line- Fastpitch to work with.

 This one was a bit of a challenge for me because the extent of sports in our household are Soccer, Dance & Tumbling! So I wasn't sure what I was going to do at first but in the end I decided I wanted to show you different ways to use this gorgeous line!
What do you think? 
I love the colors and the designs on these papers! For the notebook I used a mini composition notebook and covered front and back leaving the original tape for the binding uncovered. I then inked up the edges with Prima Chalk Ink - Knotted Wood. Then using some of the awesome cardstock stickers that go with this line I, created a little banner and tied some linen thread onto the ends. To make them stand out a bit more, I traced around them with a fine dark brown pen. 
The flowers, I punched out with a couple of Stampin’ Up! Punches; I layered them and added a button. Then I used Moxxie’s Brown Alpha’s to spell Notes.
Such a cute little notebook to carry in your purse!

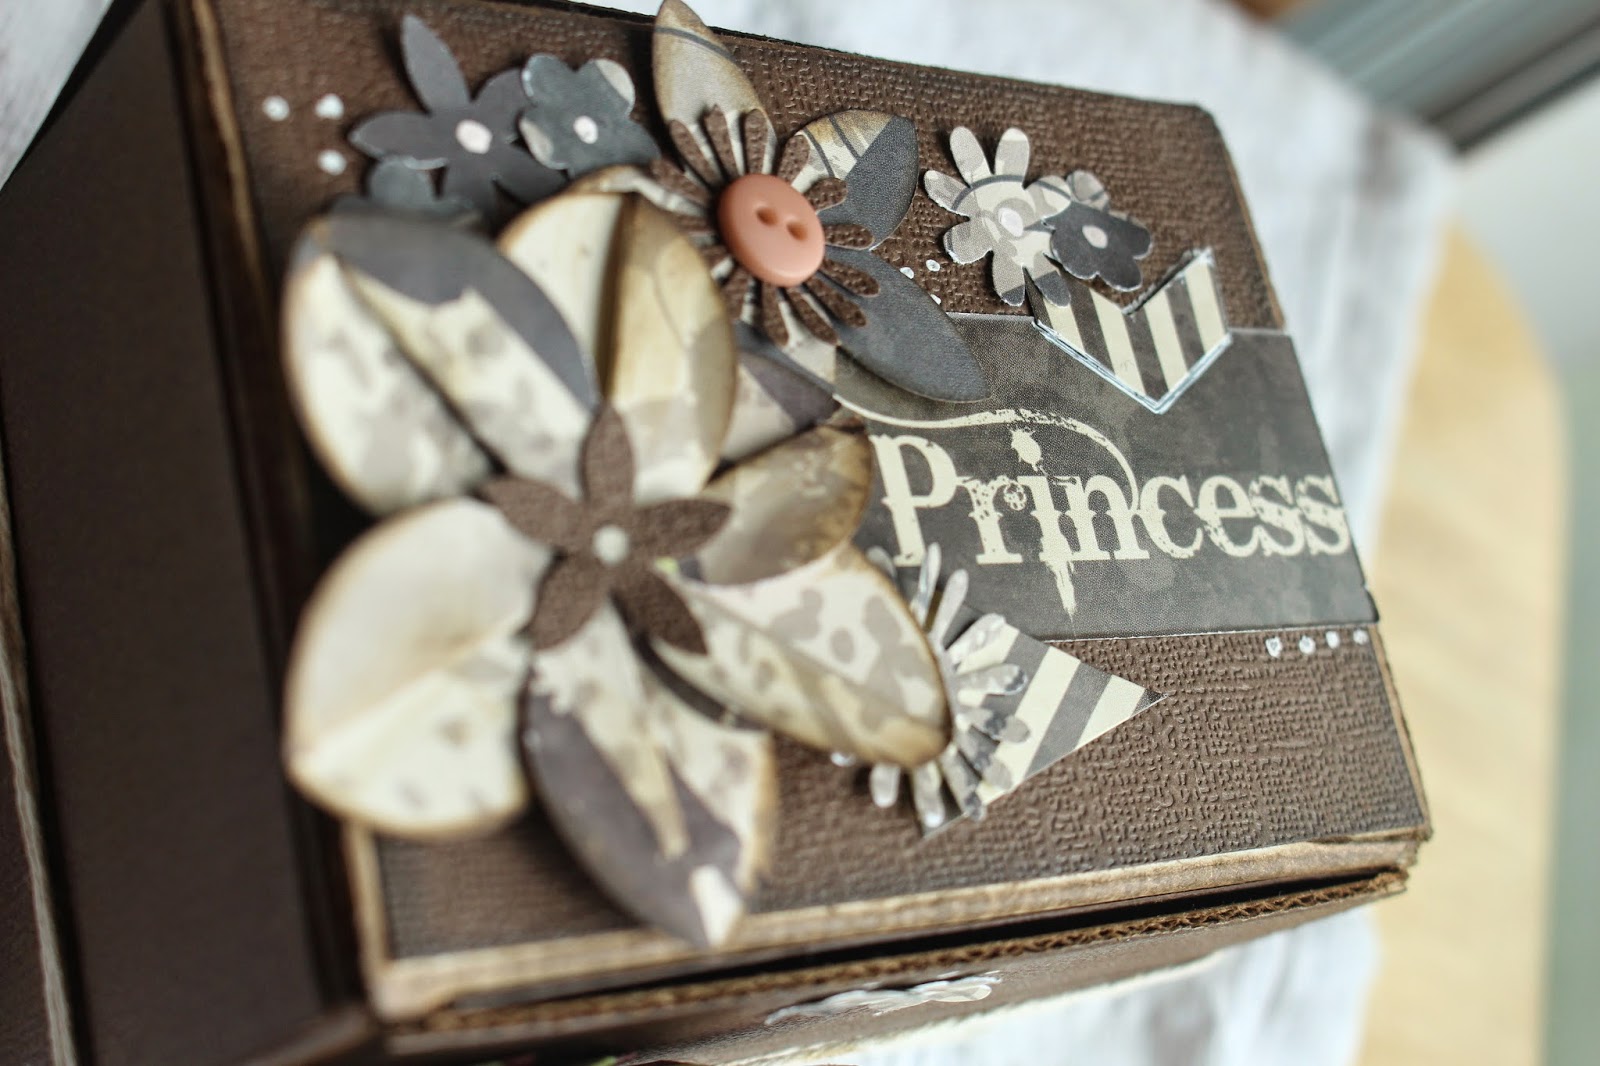
Now for my favorite! The cute little box! This turned out adorable!
I started out by taking some dark brown cardstock and cutting it down to fit the faces of the box. I then inked the edges with Prima Chalk Ink - Knotted Wood. Now for the really fun part! I followed this TUTORIAL for this quick and easy, but super cute flower! Then for additional ones I had some Stampin' Up! punches. I wrapped the twine around the box several times (this box opens from the top) and then spread it out to to draw more attention to the flower. 
I added some buttons to the middle of a few flowers and used a white pen to draw a few dots here and there. I also added in some cardstock stickers on the top. Now for the "Princess" sticker I cut apart a bigger sticker it was a part of. Don't be afraid to do something like that! :) Here's a couple shots of the top.
And what do we always need to do when we create such an adorable box!? Well, I always feel the need to fill it with chocolates! ;)

Join us showing off these fun new lines!
You can leave a comment on each of our designers' blogs for an extra entry into our giveaway.


What's the prize you ask?
You can PICK which line you receive if you WIN!

How do I WIN you ask?
Just leave a comment on the Moxxie blog hop post. 

You get extra chances to WIN by commenting on our designers' blogs and sharing with your friends. Just let us know how you shared in a comment on the Moxxie blog.

Good luck! Thanks for stopping by! :)


Moxxie Products I used:

FP- 1539 Play with the Heart
FP-1540 Batter Up
FP- 2298 Fastpitch Cardstock Sticker

AL- 2281 Brown Alphas

Friday, April 3, 2015

Moxxie {Easter Basket with Treat & Blog Hop}

I have a fun little project to share with you that's perfect for Easter! I used the beautiful new Springtime line from Moxxie aaaand it's the line you can win on our Moxxie blog hop! More details on how to enter at the end.
The colors are gorgeous and perfect for this project! I had so much fun creating this cute little basket and the adorable little treat that sits in it.
I started out with a full 12x12 sheet and scored in 3 inches from all sides. By doing that it should create squares in all four corners, I then went around and only cut one side of each square. Then you should be able to fold along the scored lines and have it start looking like a basket. I added adhesive to those squares and stuck all the sides together. Then to create the handle I cut two 1 inch strips adhered them together and onto the basket. Then added a brad on each side for additional support. 
For the front I took three different colored strips and used a Martha Stewart punch. I then added the swirly and tag from an older Moxxie line called Spring has Sprung.
Now for that adorable little "carrot" that is sitting in the basket. 
I followed an excellent tutorial HERE. On how to create this cute little "carrots". For a few extra details I used some green staples to hold the top and used a tag from the Spring has Sprung line and tied it on with some yellow twine.
Isn't that the sweetest bunny!? Here's a shot of the whole basket.

Now for more information about our amazing MOXXIE blog hop!
Here is our line up of inspiration:
(remember to comment along the way for more chances to WIN!)


All of the ways you can enter to WIN!: 
 Comment on the Moxxie blog.
(US addresses only please)
Extra chances to win include:
1- Comment- on any (or all) of the designers blogs (1 entry per comment per blog)
2- Facebook- share the blog hop post or one of the challenge posts (let us know by leaving a link on the Moxxie blog)
3- Pinterest- pin any (or all) of these wonderful projects (leave a link for each pin on the Moxxie blog)
4- Challenge- Enter your paper-made take on our SPRING challenge using the link up on the Moxxie challenge post. 3 extra entries if you use MOXXIE product! Link directly to your project or project post. (If it doesn't link directly to the page containing your project, it will be removed)
Commenting and Challenge end April 30th.
Winner announced Fri. May 1st.

Thanks for stopping by! :)


Moxxie Products I Used:
SPR-1520 Dandelion Wishes
SPR-1521 In Bloom
SPR-1522 Take Flight
SPR-1524 Springtime Cutouts

SS-4011 Spring Double Sided Diecuts
SS-2212 Element Sticker

Friday, March 6, 2015

Moxxie {Unique & Blog Hop}

It's time for another fun Moxxie Blog Hop and giveaway! Details on how to enter at the end of my post. First, let me share with you a layout using Moxxie's new line Tiny Dancer!

It's so much fun watching my daughters perform. Senedra this year chose to do a dance class and has loved it! They got a chance to perform at a basketball games half time. The song they performed to was Unique by Lenka. Such a cute song and the reason for the title of the layout.
I used quite a few strips of designer paper and barcode strips, behind the main colored pictured of my daughter. Also did some distressing around the edges on them. If you look closely you can see I've "popped" the picture up with some 3D-foam dots to make it more "pop" on the layout and because I hid journal card behind it. 
Here's a picture of journal card in and out. You can see I added some little Imaginisce jewels along the top and bottom of the journal card and a little sticker from the sticker sheet to create the little tab. That way it would stand out a bit more from behind the picture. I love doing little hidden pockets like this occasionally on my layouts.
These cute banners are stickers that coordinate with this line and then I just adhered some sequins all over the layout to add a little sparkle to it.
I love these curlies that come on the sticker sheet! They are so cute. 
I used Moxxie Alpha's for the title.
This tag I popped up for some more dimension with some more 3D-foam dots, sanded and distressed the edges and added some black brads to an end.
I love how this layout turned out and all the different textured and dimension I was able to add with just the paper.
Thanks for stopping by! :)

Now for the details on the blog hop and how to win!
Don't forget to leave comments on the Moxxie blog and any or all of the Muse's blogs for a chance to WIN!
Here's the line up, in case you missed any:
 To be eligible to WIN 
 all you have to do is comment on the Moxxie blog.
(US addresses only please)
Extra chances to win include:
  Comment- on any (or all) of the designers blogs
  Facebook- share the blog hop post or one of the challenge posts (let us know by leaving a link on the Moxxie blog)
  Pinterest- pin any (or all) of these wonderful projects (leave a link for each pin on the Moxxie blog)
  Challenge- Enter your paper-made take on our SPORTS challenge using the link up below. 3 extra entries if you use MOXXIE product! Link directly to your project or project post.
Commenting and Challenge end March 31st.
Winner announced Wed. April 1st


Moxxie Products I used:

TD- 1503 Born to Dance
TD- 1504 Shine
TD- 1505 Luv 2 Dance
TD- 1506 Tiny Dancer Cutouts
TD- 2283 Tiny Dancer Sticker

AL- 2279 White Alpha #2

Friday, January 9, 2015

Moxxie {New Line Blog Hop}

Hello!
Thanks so much for joining us for Moxxie's 2015 Winter Release Hop!
We are SO excited to share all of these fabulous NEW lines with you!!

While the boss is away at CHA we thought we'd show you some of the fantastic projects our amazing Muses have already created using these wonderful lines.
You will be able to hop to each muse's blog to see all the details about their project and the entire line that they used for their project. So make sure to stick around to the end to see how you can enter to win!!

The new line I chose to work with is Winery. I love the deep rich colors and the fun alpha's that coordinate with it!
I'd like to share with you the layout I did using this gorgeous line. Right after Christmas my little family and I took off to Garden City, UT (which incidentally is only about 20 minutes away from Beaver Mountain Ski resort!) for a week long break. The girls and my husband took off skiing and I got the whole place to myself. It was utterly relaxing! As I'm sure you can tell from my picture! lol I love those quiet, relaxing moments!
 
I cut down my Fine Wine  page by about 1/2" on a side and along the top so I could then matte it onto some cardstock. Before doing that I did ink up the edges of my page with some Tim Holtz Vintage Photo Distress Ink (LOVE that stuff!). I then cut out some banners out of the papers in this line. Then created little swirls off to the sides using sequins and added a few Petaloo flowers.Here's a close up of the sequins & flowers.
I also did some fussy cutting of the wine glass on the cutouts and gave it some dimension with a few 3d-dots.
Thanks for stopping by! Hope you enjoyed my layout using Moxxie's GORGEOUS Winry line.
Don't forget enter the giveaway! :)

Don't forget to leave comments along the way. The more you comment the better chances you have to WIN!
You can also link an entry into our monthly challenge for a chance to WIN!

Here is our hop line up:


 To be eligible to WIN all you have to do is comment on the Moxxie blog.
(US addresses only please) 
Extra chances to win include:
  Comment- on any (or all) of the designers blogs
  Facebook- share the blog hop post or one of the challenge posts (let us know by leaving a link on the Moxxie blog)
  Pinterest- pin any (or all) of these wonderful projects (leave a link for each pin on the Moxxie blog)
  Challenge- Enter your paper-made take on our sketch challenge! 3 extra entries if you use MOXXIE product! Link directly to your project or project post. (link up using the inlinkz tool at the bottom of this page)
Commenting and Challenge end Jan 31st.
Winner announced Mon. Feb 2nd.

Happy Hopping!

Friday, December 5, 2014

Moxxie {Blog Hop & a CD Cube}

Hello and welcome to the Moxxie Holiday Challenge and Hop!
Today our Muses have many eye-popping designs to inspire you. We also have a fun challenge and a Prize! So lets get right to it shall we?

Our theme this month is Holiday/Winter/Christmas
and the prize, you say? 
Oh just one of these amazing lines!
 For all your furry friend's fun, holiday antics!
This line is perfect for documenting all of that holiday fun, but it's not just for your pets. Check out the awesome projects our designers created with this line, pets or no this is perfect for the holidays!

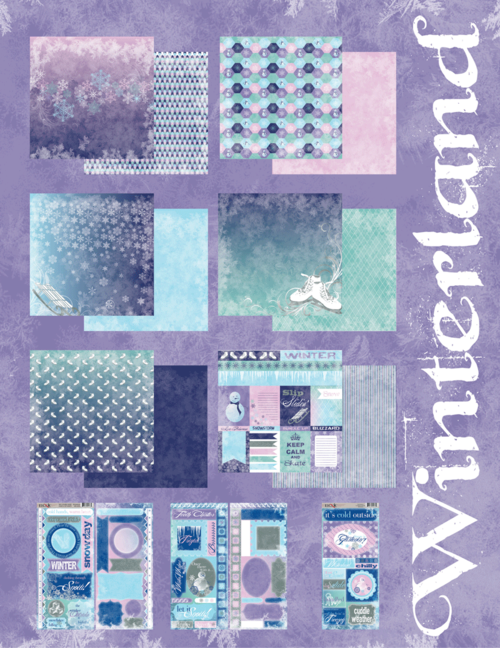
But if you're not in the market for this fun holiday line you can opt for the gorgeous Winterland!
Details on how to win are below and here is our fantastic line-up of inspiration:


 To be eligible to WIN all you have to do is comment on the Moxxie blog.
(US addresses only please) 

Extra chances to win include:
  Comment- on any (or all) of the designers blogs
  Facebook- share the blog hop post (let us know by leaving a link on the Moxxie blog)
  Pinterest- pin any (or all) of these wonderful projects (leave a link for each pin on the Moxxie blog)
  Challenge- Enter your holiday project in our challenge! 3 extra entries if you use MOXXIE product! Link directly to your project or project post. (link up using the inlinkz tool at the bottom of this page)
Commenting and Challenge end Dec 31st. 
Winner announced Fri. Jan 2nd.

Now to share with you my fun little project!
I have such a fun & very cute way to display your pictures and you get to use up some of those cd cases that are just laying around! They are perfect for this time of the year, they make great gifts for the grandparents!

You’ll need 4 regular cd cases (not the slim ones).
Carefully take out the part that holds the CD in.
   Then re-assemble two of the cd cases backwards.
You’ll then need to cut four sheets to be your background for each side. The dimensions will need to be:  4 5/8" x 5 3/4" From there add your pictures, embellish away. Here are some close ups of my four.
 
 
Add them to your cube, snap all four sides together and voila! You now have an adorable center piece! You can even add a vase or candle to sit inside of it! Here's a shot from the top.
Thanks for stopping by! :)


Moxxie Product Used:
WN-1480 Frozen
WN-1482 Slip Slidn'
WN-14483 Ice Princess
WN-1484 On the Edge
WN-1485 Winterland Cutouts
WN-4024 Winterland Cutouts

Friday, November 7, 2014

Moxxie {Autumn Glory Cards & Blog Hop}

Good morning! Fall is in full swing here. The leaves have all changed their colors and are falling off. I love walking through them and hearing them crunch under my feat. It's just gorgeous around here. I love this time of year. I have some fall cards and a fun blog hop with a great giveaway to share with you today! I want to start by showing you my cards! :)
I really love how Moxxie's line of Autumn Glory really captures fall. On my Thank You card I used a Martha Stewart punch, some Bazzil Basics Paper Leaves, ribbon and a SU! stamp for the sentiment.
On this one I did a bit of fussy cutting that I "popped" up with some 3D-dots to add a little dimension. I also did some distressing and tied it off with some linen thread.
For the third card I used an embossing folder and sanded it down along with some distressing along the edges. I fussy cut around some flowers from the sheet Bountiful Bouquet and inked up the edges. Then layered them up with 3D-dots to give it some dimension.
I really love how all three cards turned out.

And of course for the blog hop info and like I said, there is a PRIZE involved!
None other than the amazing New Winterland!!!
This line has a fantastic color combo, fun patterns and cute embellishments for all of your wintertime activities!


Details on how to WIN this line are below.


 To be eligible to WIN all you have to do is comment on the Moxxie blog (US addresses only please). 
Extra chances to win include:
  1- Comment- on any (or all) of the designers blogs
  2- Facebook- share the blog hop post (let us know by leaving a link on the Moxxie blog)
  3- Pinterest- pin any (or all) of these wonderful projects (leave a link for each pin on the Moxxie blog)
  4- Challenge- Enter your card in our challenge! 3 extra entries if you use MOXXIE product! 
Link directly to your project or project post. (link up using the inlinkz tool at the bottom of this page)
Commenting and Challenge end Nov 30th.

Good luck & Thanks for stopping by! :)


Moxxie Products Used:

AG-1454 Fanciful Flowers
AG-1455 Season's Beauty
AG-1457 Bountiful Bouquet
AG-2271 Autumn Cardstock Sticker

Friday, October 10, 2014

Moxxie {Thrills and Chills & a Blog Hop}

Welcome to the Moxxie Halloween Hop & Challenge!
We have a fantastic line-up this month!! You won't want to miss a single project.
And of course we have an awesome prize up for grabs!
Your choice of Zombie Attack! or Autumn Glory!
Aren't they gorgeous? Details on how to win one of these beauties are below. But first let me share with you my layout I made for this blog hop! 
I used Moxxie's awesome new line Zombie Attack & combined it with Moxxie's line All Hallow's Eve. I love how well these two lines mix together! I even made the cute little broom down in the bottom right hand corner our of some scraps, linen thread & a toothpick! I just cut a scrap of my background paper into small thin strips then I bundled them together and tied them off with some linen thread. I used a toothpick for the handle, I broke off one of the pointy ends and sanded it down to so it was round and then stuck the other pointy end into my little bundle of paper strips. Here's a close up...
I fussy cut around the tree and the little spider web, then hung and placed some fun glittery spiders on them. I also did some ink splatters using Heidi Swapp Black Velvet Color Shine and some Xmas Red Stickles. 

Now onto how to WIN! All you have to do is comment on the Moxxie blog.
Extra chances to win include:
  Comment- on any (or all) of the designers blogs
  Facebook- share the blog hop post (let us know by leaving a link on theMoxxie blog)
  Pinterest- pin any (or all) of these wonderful projects (leave a link for each pin on the Moxxie blog)
  Challenge- Enter your Halloween project in our challenge3 extra entries if you use MOXXIE product! Link directly to your project or project post. (link up using the inlinkz tool at the bottom of this page)

 Here's our fantastic line up:


Moxxie Products Used:
Zombie Attack
ZA-1451 Hallowed Ground
ZA-1453 Zombie Cutouts

All Hallow's Eve
AH-1318 Arachnophobia
AH-4021 All Hallow's Eve Diecuts 
AH-2231 Element Stickers

Friday, September 12, 2014

Moxxie {Back to School & Blog Hop}

Good morning! Fall is in the air where I'm from and the kids are back in school. The Muses have some wonderful inspiration for you this month. Here's a little peek at what you'll find along our hop:

Don't those sneak peeks look AWESOME!? You'll want to make sure to stick around till the end because Moxxie has a fun new twist on this blog hop! ENJOY! :)

So for today's blog hop I wanted to share some projects I have made geared for back to school. What better line for such projects than Moxxie's brand new line Brainiac! I LOVE that adorable owl, he's just the cutest! :)

I was inspired by my oldest daughter who is just going into the 7th grade and was looking for things to decorate her locker. It got me thinking I needed a few cute things around our home too. :)
I found an empty can decorated it with BookwormBrainiac Cutouts, White Alphas and wrapped some twine around it. 
Then for the dry erase board I used a picture frame, a sheet of Smart-owl-ic and then fussy cut out the owl and books.
Then for the clothes pins I outlined the clothes pins onto the papers (Make the Grade, and the barcode strip from Brainiac Cutouts), cut them out and glued them on. I attached a manet to the back of the clothes pins and added them to my fridge to hold all those amazing papers and drawings that are going to start coming home from school. :)
Thanks for stopping by! :)

Now, I know you're intrigued and excited to get hopping, but before you go I want to tell you about something NEW we're doing on the Moxxie blog.

We challenge YOU to join us! That's right!
We want you to jump in on our challenge and create something with a fall theme, then go back to the
Moxxie Blog and link it to our post for an entry into our giveaway!
You will find all of the details below.

Here is your inspiration list:
Amelia Harris (You are HERE)

You might be wondering what your prize will be?
If you are picked for our winner you will get this gorgeous Autumn Glory line to create some gorgeous fall projects of your own!

 All you have to do to be entered to WIN is leave a comment on the Moxxie blog.
(US addresses only please)
BUT, you can get your name in the hat more than once!
Join our challenge and link back to the Moxxie blog for another chance to win!
Use MOXXIE product in your project and get 3, yes I said THREE, more chances to win!
You will have until the end of the month to enter your project and we will announce our winner on the 
1st of Oct.

Ways to win:
- Comment on the Moxxie blog.
- Join our challenge! (Link your project with our Inlinkz tool)
- Use MOXXIE on your project and get 3 more entries in the draw!
- Visit each designers blog and leave a comment. The more you comment, the more chances you have to WIN!
- Go to the Moxxie facebook page
 and share our post about this hop for another chance to WIN! (if you're
 not already, you will need to be a follower of our page to do this)
Come back to the Moxxie blog and leave another comment letting us know you did this.
- Go ahead and Pin It! If you do, leave a comment on the Moxxie blog with a link letting us know that you Pinned!

Sketches in Thyme {Bright}