Showing posts with label brads. Show all posts

Sunday, February 28, 2016

WarrioR

Good morning! It has been looking like Spring around here lately! I can't wait to see Summer! I have loved the little bit of sun we've been getting and I can't wait to get more! :) For now I've been scrapbooking away! This layout of my oldest daughter dancing with her Hip-Hop group was a fun sketch from Stuck Sketches.
 I loved adding all the fun sprinkles on this layout.


What is your favorite season? Have you been scrapbooking or crafting lately?
Thanks for stopping by! Have a scrappy day! :)

Products Used:
Stampin' Up! Old Olive Cardstock
Fancy Pants Hopscotch Collection
My Mind's Eye Boy Crazy Decorative Brads
My Mind's Eye Mistletoe Magic Christmas Enamel Dots
Moxxie Black Alpha's
Stampin' Up! Jumbo Eyelts

Friday, October 9, 2015

XC (Cross Country) layout

I'd like to share another layout I created using pictures from the gal I mentioned in my Monday post HERE. I used Moxxie's Cross Country line again. 
I had fun layering different pieces of designer paper from this line behind my picture. But before I did I did some distressing around the edges of each one. Here's some close up's of the embellishments. 
 
Are you runner? Have a runner in your life? This is an awesome line to scrapbook those pictures!
Thanks for stopping by! :)


Products Used:

Tuesday, June 2, 2015

Scrap It Girl {Smile card & Challenge}

Hello! Time for another Scrap It Girl Challenge! This month we are challenging you to use- brads, bling & buttons. I do so enjoy using all sorts of embellishments! :) 
I created a card for this challenge...
I created a tri-fold card and used some Imaginisce jewels and some brads on the front. I used the Imaginisce jewels in the middle of the flowers. 
Then on the inside I added a cute little flower button and added a couple of flowers with some more Imaginisce jewels in the middle.
Head over to Scrap It Girl's site to see some more inspiration on this fun challenge from the other Design Team Memebers! Once there, join us with this fun challenge and link it up over at Scrap It Girl and show us what you've created! 
Thanks for stopping by! :)

Thursday, May 14, 2015

Moxxie {Live to Play Layout}

Hello! I have a fun layout to share with you today! The best part is I'm using Moxxie's new Softball line and NOT using it for anything softball! I love doing that with lines! It's a bit challenging for me at times but I really love the challenge. I totally love the end result! lol Ok, I won't tease you any more here is my layout.
This picture is of my two younger sisters and my first daughter. Pulling out this picture brought back so many fun and fond memories. Love those girls!
My base a sheet from Moxxie's new softball line called Fastpitch. Then as I started digging through some of my stash I found these cute hearts I had cut out using my Silhouette Cameo a looong time ago and they had just been sitting around waiting for the perfect layout. :) I layered on top of some dark brown cardstock to really make it stand out. I inked up the edges with some Prima Chalk Ink- Knotted Wood. I then started adding in elements from the cut out sheet and the stickers all over that didn't necessarily say Softball. Here's some close up's.
I did add some ink splatters all over the page. Also added a few staples and some brads for some added texture!

Thanks for stopping by! :)


Moxxie Product I used:

FP-1540 Batter up
FP-1541 Softball Cutouts
FP-2298 Fastpitch cardstock sticker
AL-2281 Brown Alpha

Monday, April 27, 2015

Moxxie {Happy Spring}

Good morning! I love the beauty of spring! Everything is just so beautiful. I especially love the tulips. I found a couple of pictures where my two beautiful little girls when they were 4 and 2 years old. I had found them outside smelling and playing with the tulips.
This layout is great for using all those spare scraps! I started out with my base with a sheet from the football line Grid Iron. Then as I was digging through my Springtime line I started to notice I had a bunch of little spare scraps, I decided to try to incorporate them. It was a lot of fun piecing it all together. I even used some of the Moxxie Alphas for the date.
I even loved adding little extra's here and there such as enamel dots, stickers & brads. My favorite was stitching the word Love on.
Thanks for stopping by! :)


Moxxie Product I Used:
GI-1471 Football Cutouts

SPR-1519 Songbirds
SPR-1520 Dandelion Wishes
SPR-1521 In Bloom
SPR-1522 Take Flight
SPR-1523 Butterfly Garden
SPR-1524 Springtime Cutouts
SPR-2287 Springtime Sticker

AL-2293 Green Alpha
AL-2292 White Alpha

Friday, April 3, 2015

Moxxie {Easter Basket with Treat & Blog Hop}

I have a fun little project to share with you that's perfect for Easter! I used the beautiful new Springtime line from Moxxie aaaand it's the line you can win on our Moxxie blog hop! More details on how to enter at the end.
The colors are gorgeous and perfect for this project! I had so much fun creating this cute little basket and the adorable little treat that sits in it.
I started out with a full 12x12 sheet and scored in 3 inches from all sides. By doing that it should create squares in all four corners, I then went around and only cut one side of each square. Then you should be able to fold along the scored lines and have it start looking like a basket. I added adhesive to those squares and stuck all the sides together. Then to create the handle I cut two 1 inch strips adhered them together and onto the basket. Then added a brad on each side for additional support. 
For the front I took three different colored strips and used a Martha Stewart punch. I then added the swirly and tag from an older Moxxie line called Spring has Sprung.
Now for that adorable little "carrot" that is sitting in the basket. 
I followed an excellent tutorial HERE. On how to create this cute little "carrots". For a few extra details I used some green staples to hold the top and used a tag from the Spring has Sprung line and tied it on with some yellow twine.
Isn't that the sweetest bunny!? Here's a shot of the whole basket.

Now for more information about our amazing MOXXIE blog hop!
Here is our line up of inspiration:
(remember to comment along the way for more chances to WIN!)


All of the ways you can enter to WIN!: 
 Comment on the Moxxie blog.
(US addresses only please)
Extra chances to win include:
1- Comment- on any (or all) of the designers blogs (1 entry per comment per blog)
2- Facebook- share the blog hop post or one of the challenge posts (let us know by leaving a link on the Moxxie blog)
3- Pinterest- pin any (or all) of these wonderful projects (leave a link for each pin on the Moxxie blog)
4- Challenge- Enter your paper-made take on our SPRING challenge using the link up on the Moxxie challenge post. 3 extra entries if you use MOXXIE product! Link directly to your project or project post. (If it doesn't link directly to the page containing your project, it will be removed)
Commenting and Challenge end April 30th.
Winner announced Fri. May 1st.

Thanks for stopping by! :)


Moxxie Products I Used:
SPR-1520 Dandelion Wishes
SPR-1521 In Bloom
SPR-1522 Take Flight
SPR-1524 Springtime Cutouts

SS-4011 Spring Double Sided Diecuts
SS-2212 Element Sticker

Wednesday, February 4, 2015

Moxxie {#One Star Player layout}

She shoots! She scores! And the crowd goes wild for Moxxie's new Basketball line! Whooooo!
I found these adorable pictures of my oldest when she was only a year old. She loved rolling that basketball around in my mother's kitchen. :) 
I cut down my basketball sheet by 1/2" on a side and 1/2" on the top and then centered it on a sheet of cardstock. Then added some brads and the cardstock stickers.
 I did some outlining with a black pen around some of the stickers to really make them stand out, like these banners. I also used some of the black alphas for the date.
Thanks for stopping by! :)


Moxxie Products Used:

BBL- 1499 Lay Up
BBL-1500 Dribble 
BBL-1501 Jump Ball
BBL-2282 Basketball Sticker
AL-2278 Black Alpha 

Monday, January 19, 2015

Nuts About Sketches {Snowflakes are... layout}

Good morning! Hope everyone had a great weekend! Nuts About Sketches has a really fun two page layout sketch. 
I only used the left side for my layout. As I was going through my stuff I came across an older line from Fancy Pants that I absolutely love and thought it was perfect for my pictures! I love when everything comes together perfectly! ;)
I started out by inking up the edges of my paper and my pictures. I adhered my pictures and added some 3D-Dots to the middle picture to add some dimension to the layout. Next I added a cute heart sticker from the sticker sheet and and layered another sticker on top of the heart using some more 3D-dots and some brads on ends.
I then cut along the curves on another sheet and did some inking and distressing on them. Using it for my title.
Now for my favorite part! I added some Crystal Stickles to the snowflakes to make them shine.  Then I did some paper piercing and stitching into circles. Love how cute they turned out. :)
Make sure to check out the other layouts created by the other Nuts About Sketches design team members! Always great inspiration!
Thanks for stopping by! :)

Friday, December 5, 2014

Moxxie {Blog Hop & a CD Cube}

Hello and welcome to the Moxxie Holiday Challenge and Hop!
Today our Muses have many eye-popping designs to inspire you. We also have a fun challenge and a Prize! So lets get right to it shall we?

Our theme this month is Holiday/Winter/Christmas
and the prize, you say? 
Oh just one of these amazing lines!
 For all your furry friend's fun, holiday antics!
This line is perfect for documenting all of that holiday fun, but it's not just for your pets. Check out the awesome projects our designers created with this line, pets or no this is perfect for the holidays!

But if you're not in the market for this fun holiday line you can opt for the gorgeous Winterland!
Details on how to win are below and here is our fantastic line-up of inspiration:


 To be eligible to WIN all you have to do is comment on the Moxxie blog.
(US addresses only please) 

Extra chances to win include:
  Comment- on any (or all) of the designers blogs
  Facebook- share the blog hop post (let us know by leaving a link on the Moxxie blog)
  Pinterest- pin any (or all) of these wonderful projects (leave a link for each pin on the Moxxie blog)
  Challenge- Enter your holiday project in our challenge! 3 extra entries if you use MOXXIE product! Link directly to your project or project post. (link up using the inlinkz tool at the bottom of this page)
Commenting and Challenge end Dec 31st. 
Winner announced Fri. Jan 2nd.

Now to share with you my fun little project!
I have such a fun & very cute way to display your pictures and you get to use up some of those cd cases that are just laying around! They are perfect for this time of the year, they make great gifts for the grandparents!

You’ll need 4 regular cd cases (not the slim ones).
Carefully take out the part that holds the CD in.
   Then re-assemble two of the cd cases backwards.
You’ll then need to cut four sheets to be your background for each side. The dimensions will need to be:  4 5/8" x 5 3/4" From there add your pictures, embellish away. Here are some close ups of my four.
 
 
Add them to your cube, snap all four sides together and voila! You now have an adorable center piece! You can even add a vase or candle to sit inside of it! Here's a shot from the top.
Thanks for stopping by! :)


Moxxie Product Used:
WN-1480 Frozen
WN-1482 Slip Slidn'
WN-14483 Ice Princess
WN-1484 On the Edge
WN-1485 Winterland Cutouts
WN-4024 Winterland Cutouts

Saturday, November 1, 2014

Scrap It Girl {Mixed Media Thank You card & new challenge}

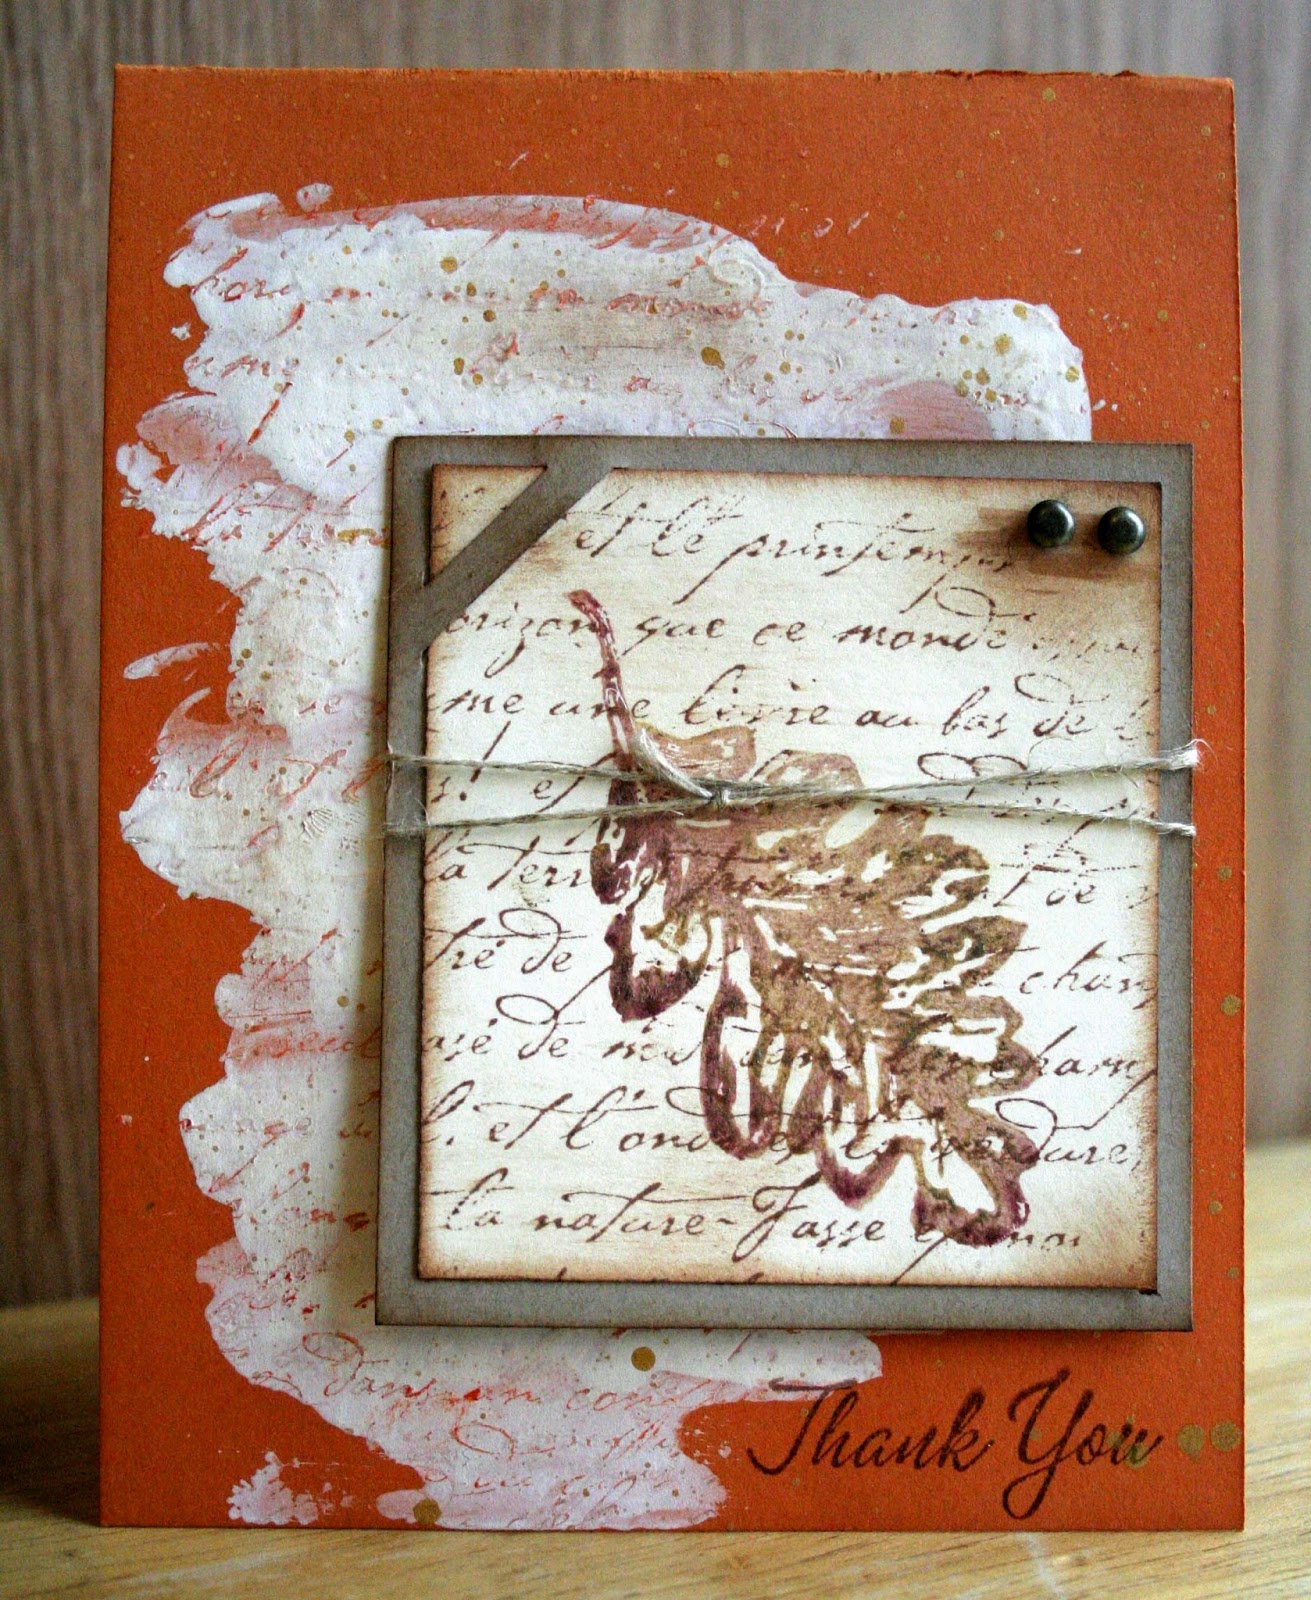
Happy November 1st! It's time for a Scrap It Girl monthly challenge! This one is fun one! For this challenge we challenge you to use mixed media such a paints, water colors or gelatos. Here's a card I made using gelatos & gessso.

I started out out with a 4.25" x 5.5" card base and smeared some gesso around on the card. I ran an orange gelato over SU! French Script and stamped it into the gesso. I love the effect, the script stands out a bit more because of the orange. After the gesso dried I spritzed it with some Heidi Swapp Gold Color Shine. For the leaf I applied two different colors directly on the stamp I used a dark red watercolor crayon on half of it and then a overlapped just a bit of a gold gelato. Then I used a brush dipped in some water to go over the crayon and gelato and tried to mix the colors a bit. Next I stamped it on some cream cardstock. I used the same SU! French Script stamp that I stamped on the gesso to stamp over the leaf. I really love how beautiful it came out.  The picture really doesn't do it justice. The gold on the leaf from the gelato and the gold from color shine really make this card sparkle.
Being honest, I was really nervous doing this challenge because, while I do own these different mediums I just haven't made the time to play with them much. So I really enjoy the extra challenge to get me using them more. :)

Now make sure to head over to Scrap It Girl and join us for the challenge! Remember you are welcome to link up to two projects and they must contain paints, water colors or gelatos. We LOVE to see everyone's fun projects. Make sure to challenge yourself to try new things! :) 
Thanks for stopping by! :)

Tuesday, September 23, 2014

Moxxie {16 Fall cards with a One Sheet Wonder}

Hello! How is everyone doing? Today I have fun project to share with you using Moxxie's new line 
Autumn Glory I just love the deep, rich colors of this line.
I don't know about you guys but I'm always in need of a few "Thank You" cards. The easiest and fastest way to pump a few out is by using a One Sheet Wonder (a.k.a OSW) template. Have you ever heard of these? It's where you take a sheet of designer paper and you cut it up according to the template you have and allows you to create a bunch of different cards in a short period of time. It's a great way for me to use some of my cardstock scraps also. :) I've used this particular template a few times and I've been able to produce 14-16 cards, today I produced 16 cards.
Here's my 16 cards!
I used some Kraft cardstock as my base for all the cards and then found some different "Thank You" & "Thinking of You" sentiments in my stamps. Then found some cardstock scraps that matched along with the colors of my designer paper so that I could embellish and accent a bit more with it. I also used various embellishments such as linen thread, brads & twill tape along with inking along the edges using Tim Holtz Distress Ink Photo Vintage. Here's a close up the cards. 

Thanks for stopping by! :)


Moxxie Product Used:
AG-1456 Foliage in Flight

Sketches in Thyme {Bright}