Showing posts with label Cardstock. Show all posts

Thursday, February 25, 2016

Sweet Music

Hello! My layout today was inspired using a sketch and their Circle Roundup from Scrapbook Circle.  I also used a color challenge from Scrap Much?. This layout of my 2nd daughter performing her first Viola solo. She did such a great job.  

 Here's some close up's. For the title I used some black foam Thickers that I then traced out with a white Signo pen along with some foil alphas. I love the foil Alpha's! They look awesome when they catch the light just right. 
 I had some washi tape that was perfect for this layout. Along with some fun puffy stickers.
 I also popped up my middle picture with some foam adhesive to give a little dimension.

Thanks for stopping by! Have a scrappy day! :)

Products Used:
Crate Paper Hello Love
Cardstock
Heidi Swapp Puffy Stickers
Heidi Swapp Black & White Fabric Bows
Washi Tape
American Crafts Chalkboard Labels
American Crafts Thickers You & Me
Uniball Signo White Pen

Wednesday, May 27, 2015

Moxxie {3- Happy Birthday Cards}


Good Morning! How was everyone's Memorial Day weekend? It was quiet and rainy around my place, but very welcomed. The kids are mostly done with activities and out of school for the summer.  I'm ready for life to slow down for just a little bit! ;)

Today I want to share with you some really fun Birthday cards I made using one of Moxxie's new lines- Magical Moments. 
This line is so bright and colorful! I love how the colors are perfect for summer but it's the perfect line for any Disney trip layouts or projects! Such a cute fun line. Want to see the cute Birthday cards I made using that adorable line? ;)
The really awesome part is when you open them! I used the same technique on all three for the inside but they all look different. We'll start with the first card on the left. The base of this card is black cardstock I then cut out a piece from the Magical Moments Cutouts and layered. Next I stamped the sentiment right onto the cutout.
Now for the inside.....  
I created a little "gift" with some balloons that I cut out freehand out of some of the scraps I had from this same line. Then tied on some bakers twine to the ends of them and stamped my sentiment along the top.

For the next card I started out with a red sheet of cardstock for the base. I then rounded up some scraps I had and cut the ends to created little banners. Then using a black journaling pen to create some faux stitching around the edge. 
Onto the inside. I love stars! I just fussy cut them from the sheet Wishes and adhered them all over.

Last but definitely not least..... For this one I used a yellow cardstock base layered with a piece from the sheet Dreams Come True. Next I added "Happy Birthday" using Moxxie's Black Alpha's. I then used the banner from the sticker sheet, added some Imaginisce jewels in between each one and a few by the sentiment.
If you thought one "gift" was cute, in the first card you'll really love this one! I love how adorable the gifts look stacked up. I wrapped some ribbon on each one and added bows, to really make them look like gifts
Now I told you at the beginning that I had used the same technique for the inside of all three cards. I found this awesome pin on Pinterest and had to give it a try. To see it Click HERE. 
I loved how fun and easy these cards were to make! 
Thanks for stopping by! :)


Moxxie Products I used:

MAG 1531- Daisies
MAG 1532- Wishes
MAG 1533- Dreams Come True
MAG 1534- Miss Mouse
MAG 1535- Magical Cutouts
MAG 2295- Magical Cardstock Stickers

AL 2278- Black Alpha

Tuesday, September 23, 2014

Moxxie {16 Fall cards with a One Sheet Wonder}

Hello! How is everyone doing? Today I have fun project to share with you using Moxxie's new line 
Autumn Glory I just love the deep, rich colors of this line.
I don't know about you guys but I'm always in need of a few "Thank You" cards. The easiest and fastest way to pump a few out is by using a One Sheet Wonder (a.k.a OSW) template. Have you ever heard of these? It's where you take a sheet of designer paper and you cut it up according to the template you have and allows you to create a bunch of different cards in a short period of time. It's a great way for me to use some of my cardstock scraps also. :) I've used this particular template a few times and I've been able to produce 14-16 cards, today I produced 16 cards.
Here's my 16 cards!
I used some Kraft cardstock as my base for all the cards and then found some different "Thank You" & "Thinking of You" sentiments in my stamps. Then found some cardstock scraps that matched along with the colors of my designer paper so that I could embellish and accent a bit more with it. I also used various embellishments such as linen thread, brads & twill tape along with inking along the edges using Tim Holtz Distress Ink Photo Vintage. Here's a close up the cards. 

Thanks for stopping by! :)


Moxxie Product Used:
AG-1456 Foliage in Flight

Thursday, May 1, 2014

Rainbows

Time for a new challenge at Scrap It Girl! This month we are focusing on Mothers and/or Mother Nature. I went with some pictures I had of a gorgeous double rainbow. You just don't get to see those every day! I wanted a layout that would really accentuate the colors of the rainbow. 
Coloring is a bit off on the picture but I used some gray cardstock for the base and then decided to go with washi tape for all the colors! I am a total washi tape addict! What I was amazed at was that I did not have a single purple! Time to do some shopping! ;) So to make up for it I found some designer paper that I thought had a nice pattern on it and created some strips. I was amazed at how well it all came together. All the wording was done on my Silhouette. Before laying down the washi tape I used sprayed some Shimmerz Goldie Lox spritz all over the gray cardstock. LOVE the little bit of gold sparkle to it. Here's some close ups. I also used some Imaginisce bling on the word RAINBOWS. 


Now don't forget to head over to Scrap It Girl and check out the other designers amazing projects! Make sure to jump in and link up your own project there! There's a great prize! ;) Thanks so much for stopping by! :)

Saturday, March 1, 2014

Scrap It Girl March Challenge: Birthday's!

Happy Birthday to everyone in March! Especially to two of my fellow DT members over at Scrap it Girl! Huge Birthday shout out to 

This months challenge at Scrap It Girl is going to be Birthday's! So I went and found some cute pictures of my youngest's birthday last year. She is so into La-la Loopsy dolls right now so of course we HAD to have a La-la Loopsy cake! 
For this layout I went over to Nuts About Sketches and found a sketch that I loved and fit my two pictures perfectly! I used Sketch #242. I used a kit a I've had for quite awhile from KI Memories. I've used it on another birthday layout HERE. I'm really having a ton of fun with it! It has some fun shimmery papers in it and some really fun embellishments. I did the basic cutting but used my little circle cutter to get a the purple circle behind the title. Then my little "extra" that wasn't in the kit were these cute colored staples I've had for awhile and thought the colors were perfect for this layout! 


Thanks for stopping by! Come and join me over at SCRAP IT GIRL for this fun challenge and great prize and to see what the other design team members have created! Always a ton of fun and inspiration! :) Hope to see you there!

Friday, January 31, 2014

One Spooky Night

This past year for Halloween we decided to do something fun! We picked a theme and ran with it! We went with Alice in Wonderland. I was the Queen of Hearts, my daughters were- Alice, the White Rabbit and the Cheshire Cat. My husband was an excellent Mad Hatter! lol It was so much fun putting these costumes together. Fun times!
So as I'm going through my stash of goodies I knew I wanted to find something fantastic to create a layout with this picture and take on Memorable Seasons stash-busting challenge. And that's when I found it! An acetate overlay with foil from Little Yellow Bicycle! Totally forgot when & where I got it! I started with a sheet of gray Bazzil cardstock and I some heat embossing to get the black diamond pattern behind the picture. Love the way the black embossing powder turned out!
I also added some Tim Holtz Pumic Stone Distress ink and some
Stampin' Up! Whisper white ink to the page. I was a little hesitant about the white I applied all over the page but with the overlay it was perfect! I also cut out my own cute little banners and used some black & white hemp cord to string them across. Once was I was done with the cardstock I then placed the acetate overlay over my layout. Doesn't it look awesome!?

Thursday, October 28, 2010

Naming Your Home

HowDoesShe? Did an amazing post here, titled  3 TRICKS to take the WORK out of housework a bit ago. It seemed to hit about the right time for me.  When it comes my home I really stress out a lot about it not being in tip top immaculate shape! I know I'm being a bit ridiculous, especially since I have 3 little girls that love to play and make messes :) But I really tend to work myself up into such a stressed out frenzy over the "mess" in my home. I become overwhelmed and then to top it off I am NOT a fan of  doing dishes or folding and putting away laundry. So coming across this post the other day really hit home! Here's a paragraph that I never get tired of reading:
 "The most important trick to taking the “work” out of housework is ATTITUDE.  If you can shift your paradigm about why we keep house, by altering your attitude, you have unlocked the key to happy homemaking.  Now go back and read that last sentence again.  If you can really do this, it will be very powerful."
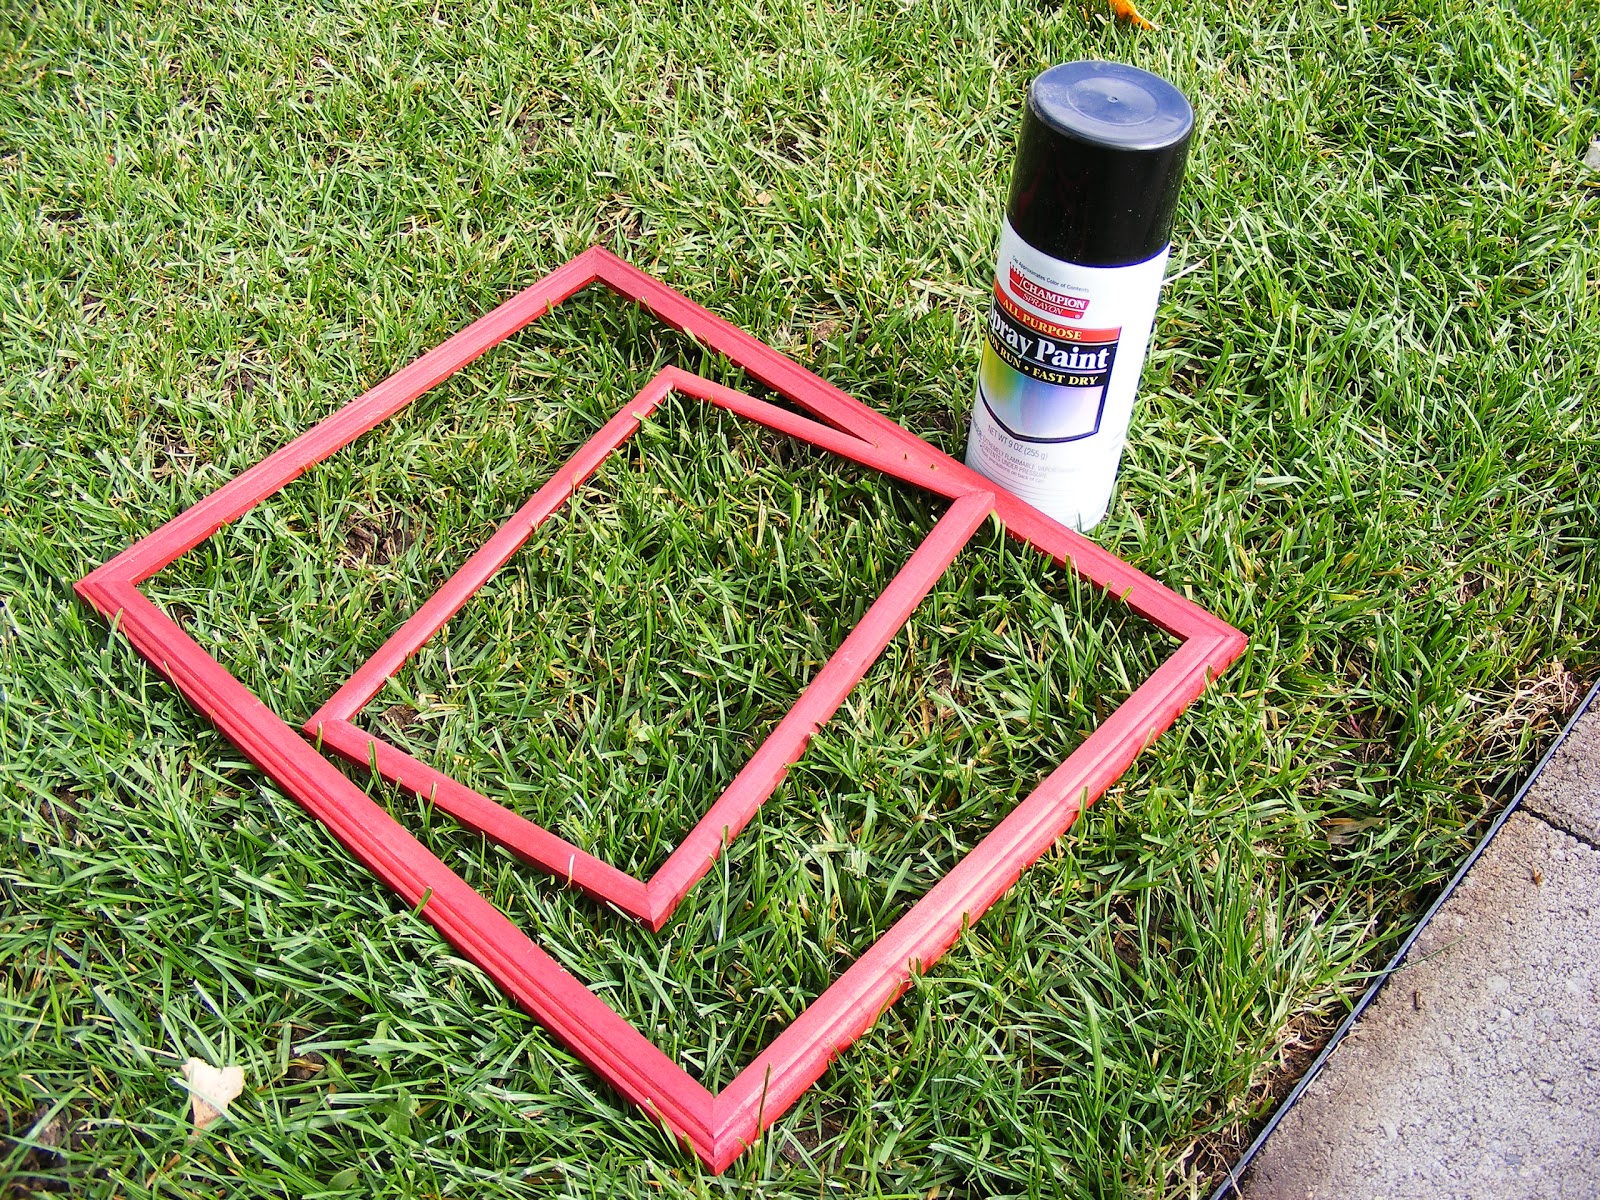
   I have that post bookmarked and keep referring back to the other two tricks! One thing I really loved about it was that one of the 3 Tricks is naming your home. I know, I know it sounds a little weird but the idea is that you need to take pride and ownership of your home. For me this is really hard. We have found a few problems with the home we live in and it doesn't exactly fit our family any more.We would love to move and find a better and bigger place or even just build our own home, but that's not something we can do right now. So when I read that, I immediately latched onto that idea, anything to help me out! I immediately asked the girls to help me come up with a few names so we could pick out our favorite one. What we came up with was Cozy Cottage. It works great for our cute little home! So I went right to work at finding a way to create a sign for our new name. I went to the Dollar store bought two frames and then visited a hardware store for some little tiny i-bolts. The rest I had at home!

First step was to paint my frames. They were a red color that was alright but not my favorite. So I spray painted them black. I figured I would give them two coats of paint but when the first coat dried and had a bit of red showing through I ended up really liking that so I didn't do the 2nd coat of paint.


I then got busy on my computer and just using Microsoft Word I created the name and added our address! Very simple! I then just screwed in the i-bolts to the bottom of the big frame and top of the little frame and tied them together with some ribbon. I immediately hung it up by our front
door! I think it looks great! And you know every time I see that name I do feel a bit more pride in my home. :)


Tuesday, February 5, 2008

Making Changes...

Well hello! I know I've been horrible at updating....why does life feel like it can get in the way all the time!!?? The very nerve! LOL Anyway, I've decided to make a few changes to my blog. First of all I've changed the look a little. Second it will still primarily be a place for me to post my crafts and stamping but I will begin including a little more about my family and third of all I REALLY hope to be able to post more regularly.

Well since it has been so long since I have posted anything I will share a quick card that I made last fall. I really fell in love with the new In Color Purely Pomegranate from Stampin' Up!


I hope everyone's new year has so far been good!

Monday, November 26, 2007

Name Frames

I have been working on name frames for my daughters. I finished Adara's way back but finally got around to doing Senedra's now I've got one more to do! Yeah! They have actually been a lot of fun to work on and just let my imagination roam with them. I pick out a stamp set that best suits their personality and let them pick one color and then I just go from there. I never really have a plan when I begin. But I overall I really liked the final outcome!

On this one I wheeling the Flitting By Jumbo wheel across the Perfect Plum to create a background I then cut out Pale Plum, Perfect Plum and the Confetti White Cardstock to layer over each other. I also used the Color Spritzer with a Perfect Plum Marker to spritz over the entire thing once I was done.

All Supplies from Stampin' Up!:
Stamps:
Bold Butterfly Stamp set & Flitting By Jumbo Wheel
Paper: Perfect Plum, Pale Plum, & Confetti White Card stock
Ink:
Perfect Plum, Pale Plum
Other:
Silver Brads, Narrow White Grosgrain, Narrow Eggplant Grosgrain, White Organdy Ribbon, & Black Frame from Walmart


This one I really had fun with! I think in doing the first name frame I was feeling a bit intimidated but after seeing how easy it was to make one I really just had fun with this one! I used these fun animals on this one because my daughter abs
olutely loves animals. So I stamped them and then cut them out and used an exacto knife to cut around the elephants ear and the lions head so I could put them thru the letters. The two Flower brads that are on here I have no idea where I got them.....I am a horder! There I've said it! LOL Now that, that is in the open I've had them for years and just kept them for the "perfect" project, I'm sure many of you can relate to that! Anyway, I used the White Gel pen from SU! to make middles on the flowers...can I just say I LOVE that pen it works so well all the time!

Most Supplies from Stampin' Up!:
Stamps: Monogram S, Monkey Business, Wild about You, & Big Deal Alphabet
Paper: Certainly Celery, Cameo Coral, Tempting Turquoise, Apricot Appeal, Old Olive & Whisper White Card stock
Ink: Certainly Celery, Cameo Coral, Tempting Turquoise, Apricot Appeal, Going Gray, Pumpkin Pie, & Close to Cocoa
Other:
Silver Brads, Narrow Apricot Appeal Grosgrain, Narrow Tempting Turquoise Grosgrain Ribbon, flower brads (unknown origin) & Black Frame from Walmart


Have any of you done name frames? I would love to see pics of them if you have any!

Thursday, June 28, 2007

Confessions....

Alright, alright! I confess! I've been holed up in my scrap room DEVOURING my new Stampin' Up! Catalog!! YES! I got my 2 boxes earlier this week and I have not wanted to put it down since I got it!! Once you get a glimpse of this catalog and if you have the whole "demonstrator/stamping" sickness you'll see why! It is....Beautiful. The cover, the stamps....oh, the accessories! I'm trying not to drool on my keyboard as I'm telling you all of this! LOL Ok, so you can tell I've got the "sickness" bad! I really do think this is one of Stampin' Up!'s best catalogs yet. I feel like they are truly in touch with the market on this one. If you haven't seen one PLEASE get a hold of a demonstrator, quickly!!

Well, since now you know the REAL truth of why I haven't been stamping I'll show you a scrapbook page I did a while ago. On this page I used a 12x12 sheet of Pretty in Pink card stock and I wheeled the Petals Wheel (found in the Spring Mini) with Pretty in Pink ink across the bottom. The "Happy Together" is from the Double sided Petals & Paisleys Designer Paper. The three little flowers and the little saying "find joy in the little things" are from the stamp set Polka Dots & Paisley. On the flowers I stamped them with Versa Mark then used daubers & chalks to color them.

All Supplies from Stampin' Up!:
Stamps: Polka Dots & Paisley & Jumbo Petals Wheel
Paper: Pretty in Pink, Whisper White & Tempting Turquoise Card stock

Ink: Versa Mark & Tempting Turquoise

Other: Silver Brads, Narrow Light Pink & White Organdy Ribbon

I don't scrap book very much, I will get a page done here and there as I need them for samples. It's not that I don't enjoy doing them but that I never feel that they turn out "cute" enough. Oh, well. Although I was quite pleased with this one. My husband, Jeremy, is holding our youngest daughter Arell Lynn and cuddling a little bit with her. She was about 3 months old in that picture and now she is about to turn 9 months!!! Where does the time go!

Tuesday, June 26, 2007

Wild about You!!


Well I'm still at it....playing Bingo with Julee!!!! I haven't had too much time to actually stamp much these past few days but Julee posted another sketch for the Bingo game that I just had to try it! I'm not sure how well I like this card. I really love this set. I'll post more info on this card tomorrow along with a recipe. It is way past my bedtime. :)

All Supplies from Stampin' Up!:
Stamps: Wild About You
Paper: Only Orange, Confetti White, Taken with Teal & Old Olive Card stock & Simply Scrappin' Party Pieces Designer Paper

Ink: Only Orange, Old Olive & Basic Black Classic Inks

Other: Silver Eyelets; Slider, Corner Rounder 1 1/4" circle & Key Tag Punch; Coluzzle, Metal Edge Tags, Crafters Tool Kit

Friday, June 22, 2007

Another Blogger Bingo Card

Alright, I told you a few days ago that I had joined a Bloggers Bingo Game over at Poetic Artistry.
Well here is my 2nd attempt at the card challenge. I used Real Red as my card base , then I stamped the cake from a BRAND NEW stamp set out of the Preview Brochure called "Year after Year". I used a blender pen to pick up some sliver ink from my Silver Encore pad to color the platter stand, a Real Red Marker for the heart and added a bit of Dazzling Diamonds around he edges. I used the sentiment from another stamp set that was in the Preview Brochure, "Hugs & Wishes". I added a little flower and a silver brad to the corner of the sentiment and adhered it using a dimensional. I then used the Silver Encore pad to ink up French Flair stamp that was in one of Stampin' Up!'s minis a few months ago, I really hope it makes it into the new catalog.

All Supplies from Stampin' Up!:
Stamps: Year after Year, Hugs & Wishes, & French Flair
Paper: Real Red, Basic Black, Whisper White, & Brushed Silver Card stock

Ink: Basic Black, Silver Encore Pad

Other: Real Red Stampin' Write Journaler, Silver Brad, Dazzling Diamonds

Wednesday, June 20, 2007

Taking the Challenge

Last night I thought it was about time to break into my Baroque Motifs Stamp. I've had it for a few weeks now and still hadn't played with it!! I loved this stamp set when I first saw it in SU! Preview Brochure, I love swirly's! Now the REAL reason for making this card was because as I was stalking my favorite blogs last night I went to Shadowcatchers (she has such an awesome blog!!) and saw that she was doing "Bloggers Bingo" well who can pass up Bingo and she has some cool Blog Candy for the winners! Along with this cool game she has a sketch challenge for anyone that wants to participate! So I figured it was great way to really push myself to make a card on my own instead of C.A.S.E.-ing one. So besides challenging myself with the sketch I thought I would really push myself to use the new "In colors". So the main card is Purely Pomegranate, with Wild Wasabi, River Rock and the Designer Paper that matches the Stamp set Baroque Motifs. I'm not quite sure if I like it or not. What do you think??

Editing to add that the overlapping of the swirly's was something I saw on Stamping & Stuff I loved the effect that I had to try it!!

Editing to add the Recipe:
All Supplies from Stampin' Up!:
Stamps: Baroque Motifs
Paper: Purely Pomegranate
, Wild Wasabi, Whisper White, River Rock Card stock, Brocade Background Designer Paper, & Vellum
Ink: Purely Pomegranate, Wild Wasabi Classic Ink, & Whisper White Craft Ink
Other:
Wrought Iron Punch, Dimensionals

Sketches in Thyme {Bright}