Showing posts with label bakers twine. Show all posts

Wednesday, February 15, 2017

Sketches in Thyme {Tubing Jan 2016}

Good morning! How is everyone doing? Did you all have a good Valentine's Day? Today's layout I'm sharing with you is from Sketches in Thyme sketch. 

These pictures of my husband tubing with the kids. They had so much getting dad to go down! lol

I always have so much fun make the bakers twine do fun little loops.

Make sure to swing over and see the other design teams work! While you there check out the awesome prize up for grabs. 
Thanks for stopping by! Happy scrapping! :)


Products Used:
Echo Park Keepin' Cozy
American Crafts Thickers Diaquiri

Challenges:
Sketches in Thyme


Wednesday, December 14, 2016

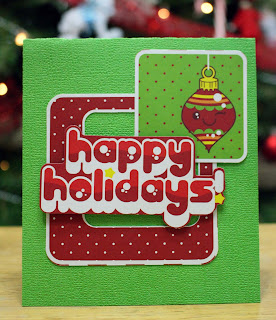
Holiday Cards & Tag

Hello! Do you make your own Christmas cards or tags? 
I had a few extra pieces from my Moxxie Party at the Pole.


Thanks for stopping by! Happy Scrapping! :)


Products Used:
Moxxie Party at the Pole

Tuesday, October 20, 2015

Halloween Wreath

Good morning! With Halloween around the corner I figured I needed a cute wreath to go on my door. Nothing says Halloween to me like orange and black and when I found some chevron burlap I knew I had to incorporate it somehow. Here's what I came up with.
Adorable! Right!? I found the letters at Michael's, I painted them black and then added a bit of glue to adhere some glitter. A little bit of sparkle adds a bit of dazzle. ;) I hot glued the letters together and then tied them onto the wreath with some twine. 
Have you got all your Halloween decorations up yet? How soon and up to how late in the month do you continue to decorate? 
Thanks for stopping by! :)

Friday, April 3, 2015

Moxxie {Easter Basket with Treat & Blog Hop}

I have a fun little project to share with you that's perfect for Easter! I used the beautiful new Springtime line from Moxxie aaaand it's the line you can win on our Moxxie blog hop! More details on how to enter at the end.
The colors are gorgeous and perfect for this project! I had so much fun creating this cute little basket and the adorable little treat that sits in it.
I started out with a full 12x12 sheet and scored in 3 inches from all sides. By doing that it should create squares in all four corners, I then went around and only cut one side of each square. Then you should be able to fold along the scored lines and have it start looking like a basket. I added adhesive to those squares and stuck all the sides together. Then to create the handle I cut two 1 inch strips adhered them together and onto the basket. Then added a brad on each side for additional support. 
For the front I took three different colored strips and used a Martha Stewart punch. I then added the swirly and tag from an older Moxxie line called Spring has Sprung.
Now for that adorable little "carrot" that is sitting in the basket. 
I followed an excellent tutorial HERE. On how to create this cute little "carrots". For a few extra details I used some green staples to hold the top and used a tag from the Spring has Sprung line and tied it on with some yellow twine.
Isn't that the sweetest bunny!? Here's a shot of the whole basket.

Now for more information about our amazing MOXXIE blog hop!
Here is our line up of inspiration:
(remember to comment along the way for more chances to WIN!)


All of the ways you can enter to WIN!: 
 Comment on the Moxxie blog.
(US addresses only please)
Extra chances to win include:
1- Comment- on any (or all) of the designers blogs (1 entry per comment per blog)
2- Facebook- share the blog hop post or one of the challenge posts (let us know by leaving a link on the Moxxie blog)
3- Pinterest- pin any (or all) of these wonderful projects (leave a link for each pin on the Moxxie blog)
4- Challenge- Enter your paper-made take on our SPRING challenge using the link up on the Moxxie challenge post. 3 extra entries if you use MOXXIE product! Link directly to your project or project post. (If it doesn't link directly to the page containing your project, it will be removed)
Commenting and Challenge end April 30th.
Winner announced Fri. May 1st.

Thanks for stopping by! :)


Moxxie Products I Used:
SPR-1520 Dandelion Wishes
SPR-1521 In Bloom
SPR-1522 Take Flight
SPR-1524 Springtime Cutouts

SS-4011 Spring Double Sided Diecuts
SS-2212 Element Sticker

Wednesday, March 11, 2015

Moxxie {I'm so Lucky}

Did you know that St. Patty's day is right around the corner? Do you celebrate it? If so, what do you do? I'm always looking for some fun new ideas! :) We really don't do much, I either prepare dinner or a treat and turn it green. It's not much but the girls have fun with it! 
The layout I want to share with you today goes right along with St. Patty's day. It's a picture I took of my husband with our girls last fall. We were doing a back to school photo shoot but you never pass up an opportunity to get pictures of everyone together! Love these people in the picture! I'm so lucky to have them in my life.
I started out with using a sheet from Moxxie's new Springtime line as my base. Lately on my layouts I've been cutting down my designer paper by 1/4" to 1/2" along a side and top and then adhere it to a sheet of cardstock giving me a nice framed look. Speaking of framing, I did a little bit of with washi tape around my picture. I then cut out my clovers and part of my title on my Silhouette. For the first part of my title I used some of Moxxie's White Alphas. 
I've also added some sequins randomly and a bit of bakers twin behind my work Lucky and stapled the ends down with some green staples.
Then here I layered a clover on top of kraft clover and centered them with a button flair. 
Have a great St. Patrick's Day!
Thanks for stopping by! :)


Moxxie Product I used:

SPR- 1521 In Bloom

FNR- 1513 Fun Run

AL- 2279 White Alpha #2

Thursday, February 12, 2015

Moxxie {Valentine's Day Treat}

Today I've got a fun Valentine's Day treat for you! I found these cute little test tubes in the $1 bins at Michael's.
 I didn't know what I was going to do with them but I knew I just had to make something! This is what I came up with! 
Adorable! Right!? I found a great tutorial on how to make the holders over at Splitcoast Stampers. Then I used some of Moxxie's Iron Grid and Tiny Dancer lines to make it all pretty. 
**I followed the directions on where to score and cut to create the box but did NOT begin to actually glue it all together until I had finished decorating it first! 

I cut a strip of designer paper about 1/8" to a 1/4" smaller than back of the box and used my corner round edge punch and did a bit of distressing on it before I adhered it down to my box. Then I cut out a strip to wrap around the middle of the box part and distressed it a bit too. I tied together two small pieces of pink & brown bakers twine and stapled them down to the box. I punched out a cute little heart of Moxxie's Tiny Dancer line and layered on a Mambi sticker- love, using 3d-dots for dimension.
On the test tube measured around the test tube cut a strip of designer paper the length and width I needed. Leaving about 1/2" extra on the length to overlap. Before wrapping it around I found the middle of my strip punched a heart out and taped a small piece pink paper behind so the pink would peek through the punched out heart. Then I traced around it with a bronze Sharpie. Once I adhered the strip around the test tube I used some more pink & brown bakers twine to tie around.
Such a fun little treat for someone special! 
Thanks for stopping by! :)


Moxxie Product I Used:

GI- 1469 Football

TD- 1504 Shine

Monday, February 9, 2015

Nuts About Sketches {Made from Scratch!}

Good morning! How was your weekend? I had a great scrappy weekend and have got some fun layouts done. This one I did using this Nuts About Sketches sketch. I chose to only do the left side of the sketch, Yes! You can totally do that! ;)
As I dug through some old pictures I found some that would work perfectly with this sketch. They are pictures of one of my youngest sisters with my youngest daughter baking up a batch of No Bake Cookies. Although, I think there was a whole lot more tasting than actual baking! lol
I used one of Moxxie's lines called Bake Shoppe. Love the cute double sided punch out embellishments and the cardstock stickers that coordinate with this line. I sponged on some Tim Holtz Vintage Photo distress ink around the edges of all my paper and on the embellishments.
 
I created this banner from some of the other papers in this line and strung it with some baker's twine.
Make sure you visit Nut's About Sketches blog and check out some more amazing samples the DT members created using that this same sketch! 
Thanks for stopping by! :)

Friday, February 6, 2015

Moxxie {Blog hop & Valentine's Box}

I LOVE Valentine's Day! I'm such a romantic. I enjoy decorating and making all sorts of fun Valentine's Day decorations. Today I've got a fun Valentine's Day gift AND a GREAT giveaway stick around until the end for details on the giveaway!
I made my fun gift using three of Moxxie's new lines. 
Tiny Dancer
Grid Iron
Springtime

 I made this cute little box and since have decided to make two more. One for each of my girls and surprise them with them on Valentine's Day.
 The cute little box was one I got from Stampin' Up! many years ago. It's such a small and cute little box perfect for small gifts. I used a strip of Springtime paper to wrap around the box and then began layering different pieces.
I made the paper rosettes out of some Tiny Dancer & Springtime paper. Here's a close up of them.
Then I punched  the hearts out of Grid Iron the Football themed paper. I just love the richness of the brown in that line. Next I popped those cute hearts up with some 3D-Dots
 to give them a bit of dimension. 
Then I inked up the wooden arrow with some Tim Holtz Vintage Photo distress ink and covered it in some Crystal Stickles. Then I used some of Moxxie's Alphas for the "XOX". I'm in love with the turquoise/blue ones. Such a gorgeous color. I then wrapped some twine around the box along the top to fill in some "empty space". I love how cute it turned out!
Below are the details for the giveaway along with the hop list! Good luck & have fun!
Thanks for stopping by! :)


 To be eligible to WIN 
(Of course there's a PRIZE!)
 all you have to do is comment on the Moxxie blog.
(US addresses only please) 
Extra chances to win include:
  Comment- on any (or all) of the designers blogs
  Facebook- share the blog hop post or one of the challenge posts (let us know by leaving a link on the Moxxie blog)
  Pinterest- pin any (or all) of these wonderful projects (leave a link for each pin on the Moxxie blog)
  Challenge- Enter your paper-made take on our LOVE challenge using the link up below3 extra entries if you use MOXXIE product! Link directly to your project or project post.
Commenting and Challenge end Feb. 28th
Winner announced Mon. March 2nd.


Moxxie Products Used:
Tiny Dancer
TD- 1504 Shine

SPR- 1524 Springtime Cutouts and barcode strip
SPR- 1520 Dandelion Wishes barcode strip

GI- 1469 Football

AL- 2290 Turquoise/Blue Alpha

Monday, February 2, 2015

Nuts About Sketches {Daddy's Girl}

Good morning! Who caught the Superbowl game? We didn't. I had high hopes of getting sooo much crafting done and did not. BUT I did get a layout done with Nuts About Sketches new sketch. I have a picture of my youngest and her daddy when she was a few months old. It's one of my favorites of these two. 
Here's a few close up's of it. For the title I used some American Craft Glitter Thickers and some Pink Paislee alphabet stickers. The little wooden doily was one I had from one of my Scraptastic Kits. LOVE it! 
Love the look of cute little banners! Banner are one of my favorite embellishments right now, right along with enamel dots. Aren't those cute hearts from Lily Bee Designs adorable!
I love this washi tape with the cute little elephants. Just so cute.
 
Go see the sketch and other wonderful examples on Nuts About Sketches blog!
Thanks for stopping by! :)

Tuesday, December 23, 2014

Moxxie {Neighbor Gifts}

Good morning! I have some fun and very easy gifts you could put together. They make great neighbor gifts. :) They could easily be paired with a roll of wrapping paper & some tape. I used two of Moxxie's amazing lines- Winterland & Happy Pawlidays.
These are 6x6 sheet protectors that I decorated and turned into envelopes! The one on the left holds 3x3 cards and the other one holds some Christmas tags, even some for those furry friend gifts! :)
You start out with a 6x6 sheet protector and carefully cut off the side with the punched holes, make sure not cut the seam that keeps it closed! Then I cut out a 8 1/4" x 6 1/2" piece of cardstock, score it at 2" down from one of the long ends. Then you also need two pieces of designer paper- one to decorate the front side (so this can be any size) but for the insert that goes INSIDE of your sheet protector you need it to be 6" x 6 1/8". Next we will add some sticky tape to the back of your sheet protector and center and stick it the back side of your cardstock below the score line. Next you'll cut off the two corners at the top to make it look like an envelope flap and add a Velcro dot towards the center (I like to keep the dots together, stick it to one side then press down to stick it to the other side) It should look like this...
Now because you can see those sticky strips and they just aren't attractive! We insert the piece of designer paper you cut earlier, the 6" x 6 1/8" one.
Now make what ever you want to put inside of them!
I made some 3x3 cards for one and some cute little tags for the other.
Well I hope I've helped you out with a last minute gift idea!
Thanks for stopping by! :)


Moxxie Product Used:

WN-1480 Frozen
WN-1481 Snow Buddy
WN-1482 Slip Slidin'
WN-1483 Ice Princess
WN-1484 On the Edge
WN-1485 Winterland Cutouts
WN-4024 Winterland Diecuts
WN-2234 Winterland Element Sticker

HA-1458 Santa's Little Helper
HA-1459 Define Naughty
HA-1460 Merry Christmas
HA-1461 Pawliday Cutouts
HA-2272 Pawliday Cardstock Sticker

Other Products Used:
Twine
Wood Veneer
Stickles
Silver Cord
Silver Ribbon
3D-Dots
Stampin' Up! All Year Cheer 1 stamp set
Tim Holtz Vintage Photo Distress Ink

Sketches in Thyme {Bright}