Showing posts with label Martha Stewart border punch. Show all posts

Sunday, January 15, 2017

Sketch N Scrap {OH So Cold}

Good morning! Sharing a great sketch from Sketch N Scrap with you today!

Here is my take on it. These pictures are of my youngest daughter when she first started skiing. I swear everything in miniature is the cutest! :)


Make sure to pop over to the Scrap N Sketch blog to check out my fellow design teams take on the same sketch, join us for the challenge and see what the awesome prize is!! 
But remember you can't win if you don't play!
Here are the details of how to play along:
1. Make sure and link back to Sketch N Scrap in your blog post when sharing our sketch or a layout or card based on our sketch.
  (DO NOT USE THE DIRECT LINK, use http://sketchnscrap.blogspot.com)
2. Link your layout or card up by clicking on the Froggy link in the sidebar.  Make sure and link up a DIRECT link to your blog post to allow us to easily locate your entry on your blog.
  Have fun, we can't wait to see what you create!
Link up your projects by January 31st at 9:55 pm CST


Thanks for stopping by! Happy scrapping! :)

Friday, December 2, 2016

Happy Christmas

Good morning! Today I'm sharing a cute layout I did of my youngest daughter when she was only a year old. I love using pinks and blue for winter/Christmas pages. It just seems like such a nice change from the traditional red and greens.
I really enjoy the glitter. I reminds me of the snow. 
I even did a bit of stitching on this layout.
I also created my own little journaling card to match the layout. I used some vellum and layered it on some green cardtsock. 
Thanks for stopping by! Happy Scrapping! :)


Tuesday, March 1, 2016

Princess Layout

Hello! My layout today is of my cute little Princess. :) She loved wearing hats. I've been holding onto an old kit from Imaginisce called Enchanted. I'd been saving it for the perfect picture(s). I think I found one. :)

I loved adding and layering all the embellishments. They were perfect. I did punch a border using a Martha Stewart punch on some grey cardstock. Here's a few close up's of all the fun embellishments. 


Thanks for stopping by! Have a scrappy day! :)

Products Used:
Imaginisce Enchanted Collection
Doodlebug Grey cardstock
Martha Stewart Embroidery border punch

Monday, February 29, 2016

Stitched with LOVE

Does anyone still do quilting? I did with my mom when I was younger and I have tried to teach my daughters. This layout is of my 2nd daughter do some quilting on a quilt for herself. She was having so much fun to begin with but by the end she was ready to be done! lol

For this layout I used a sketch from My Creative Sketches along with a challenge from Scrapbook Circle. The challenge at Scrapbook Circle is to include a heart that is stitched in some way on your layout.
For this one I just had to pull out my Sew Easy supplies for this one. The heart piercer was perfect! I did it across a piece of vellum and then stitched it up. I layered that piece of vellum over some pink cardstock that I had used a border punch on.
 Then for the title I used a mix of Alpha's and did some faux stitching around the "Stitched" and then outlined the other two words.
 I LOVE adding puffy stickers! They add great dimension to your pages. 
 Next I added some washi tape behind my picture. When I placed a strip of washi tape down I noticed it was very light and got lost in that black striped paper. To remedy that I matched up and layered the washi tape about 3x's so it would really show up better. I like how it adds a pop of color next to the picture. 

Thanks for stopping by! Have a scrappy day! :)


Products Used:
My Mind's Eye My Story Collection
Crate Paper Hello Love
Lora Bailora Washi Tape
Fancy Pant Hopscotch Stickers
We R Memory Keepers Sew Easy
Martha Stewart Doily Lace Border punch
Heidi Swapp Puffy stickers
Uniball Signo White Gel Pen
Doodlebug Cardstock

Friday, November 6, 2015

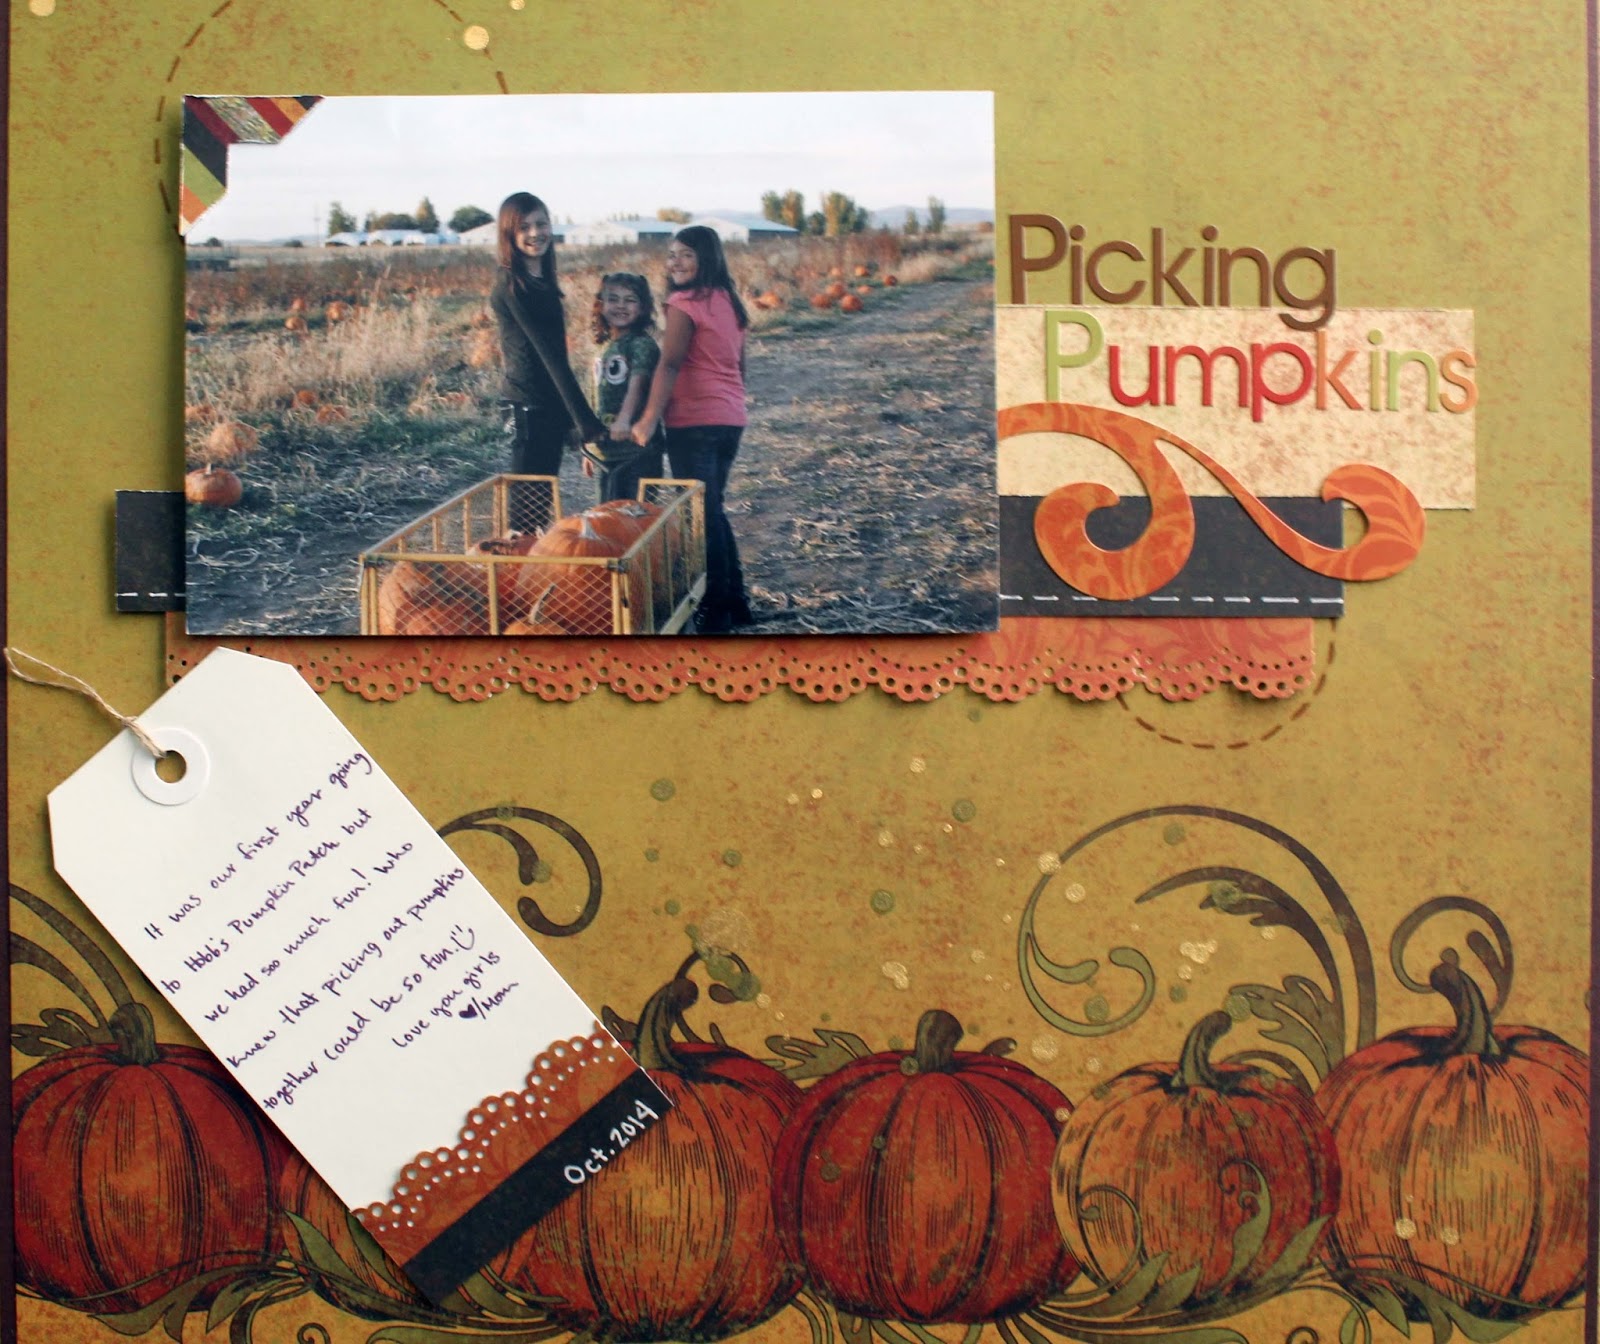
Picking Pumpkins Layout

I love fall! I love everything about it, especially pumpkins! Moxxie's new line Fall Harvest, does NOT disappoint, it's just adorable! I have the perfect picture of my girls from last year at a pumpkin patch, picking out pumpkins. We had so much fun!
I love the paper and stickers in this line. The colors are just gorgeous. Moxxie even has a beautiful Alpha sticker set that matches it perfectly. I used them here for the title. Behind the title I did some layering with other papers from the line. Also added some faux stitching with a white pen.
I also spritzed some gold ink on the background and used a punch for the frilly little scalloped border on the strip of paper behind my picture.
I really love to play around with my journaling and one of my favorite things to do is to pop up my pictures with some foam dots so I can slide in a tag behind it with my journaling on it.

Thanks for stopping by! :)


Products Used:
Moxxie Autumn Glory Alphabet
Heidi Swapp Color Shine Gold
Twine
Tag
Gelly Roll White Pen
Martha Stewart Doily Lace Edge Punch

Wednesday, October 28, 2015

Dia de los Muertos Layout

Hello again! How is everyone doing? Have you SEEN Moxxie's new line Day of the Dead? You haven't!? Uh.... what are you waiting for go! I'll even wait for you to go check it out, here's a link to get you there faster- Click HERE. I'll wait for you, just hurry!......................
Now, let me ask you again, have you SEEN Moxxie's new line!? It's gorgeous, right! The minute I saw this line I knew I had the PERFECT picture of my sister for a fun layout! 
Are you ready to see it?
What do you think!? Cool, huh! I started out with a base that I cut down by 1/4" on top and on the side, then adhered it to some black cardstock. Next, I sprayed and sprinkled some Heidi Swapp Gold Color Shine all over it and then let it dry. Then the fun of layering all those gorgeous papers came next. I did a bit of punching and some distressing on them. I also added a doily and some flowers.
For the title I used some of Moxxie's Alpha's. You can really see the ink splatters up close here. LOVE the glittery shine to them. 
As for this gorgeous sugar skull I did a bit of fussy cutting, propped it up with some 3D foam dots for dimension and lined it with a few Imaginisce jewels.
Love to hear what you think of the new line, let me know in the comments!
Thanks for stopping by! :)


Products Used:
Imaginisce Jewels
Stampin' Up Doily, Jewel Brad
Heidi Swapp Gold Color Shine
Petaloo Wild Blossoms

Monday, October 26, 2015

Day of the Dead Gift Box

Hello! I've got another fun treat to share with you using the amazing line from Moxxie- Day of the Dead! I found a cute little box that I had acquired from my Stampin' Up! days and dressed it up a bit. 
Here's a close up. I did some layering, punching and distressing on it. Added some Imginisce jewels and added dimension by popping up the sugar skull with 3D foam dots. 
I can't wait to fill it with some goodies and gift it! Let me know in the comments what you think of Moxxie's Day of the Dead line.
Thanks for stopping by! :)


Products Used:
Imaginisce
Martha Stewart punch

Monday, October 19, 2015

Celebracion Card

Good morning! I have a gorgeous card to share with you today. I used Moxxie's new line Day of the Dead. If you haven't seen it, you really should go check it out. I love how rich and vibrant the colors are and the art amazing. I love the sugar skulls!
For my base I used a sheet of black cardstock, making my card a 4 1/4" x 5 1/2". I then layered on those gorgeous yummy papers. My favorite part about these papers is how they look so much like strips of washi tape! I distressed around the edges and used my favorite Martha Stewart border punch. I fussy cut the little doily looking oval out of the cut out sheet and added dimension by "popping" it up with 3D foam dots. 
This was a very quick and easy card to put together. 
What is your favorite part of the card? Let me know in the comments! 
Thanks for stopping by! :)


Products Used:
Stampin' Up! black cardstock
Martha Stewart border punch

Monday, April 27, 2015

Moxxie {Happy Spring}

Good morning! I love the beauty of spring! Everything is just so beautiful. I especially love the tulips. I found a couple of pictures where my two beautiful little girls when they were 4 and 2 years old. I had found them outside smelling and playing with the tulips.
This layout is great for using all those spare scraps! I started out with my base with a sheet from the football line Grid Iron. Then as I was digging through my Springtime line I started to notice I had a bunch of little spare scraps, I decided to try to incorporate them. It was a lot of fun piecing it all together. I even used some of the Moxxie Alphas for the date.
I even loved adding little extra's here and there such as enamel dots, stickers & brads. My favorite was stitching the word Love on.
Thanks for stopping by! :)


Moxxie Product I Used:
GI-1471 Football Cutouts

SPR-1519 Songbirds
SPR-1520 Dandelion Wishes
SPR-1521 In Bloom
SPR-1522 Take Flight
SPR-1523 Butterfly Garden
SPR-1524 Springtime Cutouts
SPR-2287 Springtime Sticker

AL-2293 Green Alpha
AL-2292 White Alpha

Friday, April 3, 2015

Moxxie {Easter Basket with Treat & Blog Hop}

I have a fun little project to share with you that's perfect for Easter! I used the beautiful new Springtime line from Moxxie aaaand it's the line you can win on our Moxxie blog hop! More details on how to enter at the end.
The colors are gorgeous and perfect for this project! I had so much fun creating this cute little basket and the adorable little treat that sits in it.
I started out with a full 12x12 sheet and scored in 3 inches from all sides. By doing that it should create squares in all four corners, I then went around and only cut one side of each square. Then you should be able to fold along the scored lines and have it start looking like a basket. I added adhesive to those squares and stuck all the sides together. Then to create the handle I cut two 1 inch strips adhered them together and onto the basket. Then added a brad on each side for additional support. 
For the front I took three different colored strips and used a Martha Stewart punch. I then added the swirly and tag from an older Moxxie line called Spring has Sprung.
Now for that adorable little "carrot" that is sitting in the basket. 
I followed an excellent tutorial HERE. On how to create this cute little "carrots". For a few extra details I used some green staples to hold the top and used a tag from the Spring has Sprung line and tied it on with some yellow twine.
Isn't that the sweetest bunny!? Here's a shot of the whole basket.

Now for more information about our amazing MOXXIE blog hop!
Here is our line up of inspiration:
(remember to comment along the way for more chances to WIN!)


All of the ways you can enter to WIN!: 
 Comment on the Moxxie blog.
(US addresses only please)
Extra chances to win include:
1- Comment- on any (or all) of the designers blogs (1 entry per comment per blog)
2- Facebook- share the blog hop post or one of the challenge posts (let us know by leaving a link on the Moxxie blog)
3- Pinterest- pin any (or all) of these wonderful projects (leave a link for each pin on the Moxxie blog)
4- Challenge- Enter your paper-made take on our SPRING challenge using the link up on the Moxxie challenge post. 3 extra entries if you use MOXXIE product! Link directly to your project or project post. (If it doesn't link directly to the page containing your project, it will be removed)
Commenting and Challenge end April 30th.
Winner announced Fri. May 1st.

Thanks for stopping by! :)


Moxxie Products I Used:
SPR-1520 Dandelion Wishes
SPR-1521 In Bloom
SPR-1522 Take Flight
SPR-1524 Springtime Cutouts

SS-4011 Spring Double Sided Diecuts
SS-2212 Element Sticker

Sketches in Thyme {Bright}